Look for the coloured sticker on your modem box to know which set-up guide fits your service.
Is the sticker on your box yellow? Great – let’s start!
1 - Plug in the cables
- Plug your power cable into the modem, and then into the power socket. Don’t forget to switch the power socket off first.
- Next, plug one end of a phone cable into the DSL port on your modem, and the other end into your phone wall socket.
- It’s time for your phone. With an nbn® connection, you’ll plug your home phone into the ‘Phone 1’ port on your modem - not the wall socket.
- You can now use an ethernet cable to connect any devices that won’t be using a Wi-Fi connection.

2 - Check the lights
- Power up your modem by switching on your wall socket and pressing the power button on your modem.
- Wait 15 minutes for your modem to auto-configure.
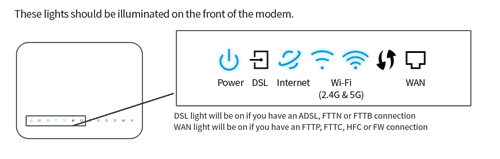
- After 15 minutes, the first four lights (shown in the image below) should be on.
- If the lights haven’t turned on, turn your modem off and repeat this step.
3 - Connect your device
- It’s time to connect to your Wi-Fi!
- Look for the ‘SSID’ – your network name, and WLAN Key – your password, on a sticker at the bottom of your modem.
- Connect your devices to Wi-Fi by searching for the ‘SSID’ and using the ‘WLAN’ key as the security password.
- To connect a device directly, plug one end of the supplied Ethernet cable into the yellow LAN port on the back of the modem and the other into your device.
You’re all done!
If your internet isn’t working – go through each of the steps again before contacting our tech support team.
Is the sticker on your box yellow? Great – let’s start!
1 - Plug in the cables
- Plug your power cable into the modem, and then into the power socket. Don’t forget to switch the power socket off first.
- Next, plug one end of a phone cable into the DSL port on your modem, and the other end into your phone wall socket.
- It’s time for your phone. With an nbn® connection, you’ll plug your home phone into the ‘Phone 1’ port on your modem - not the wall socket.
- You can now use an ethernet cable to connect any devices that won’t be using a Wi-Fi connection.

2 - Check the lights
- Power up your modem by switching on your wall socket and pressing the power button on your modem.
- Wait 15 minutes for your modem to auto-configure.
- After 15 minutes, the first four lights (shown in the image below) should be on.
- If the lights haven’t turned on, turn your modem off and repeat this step.
3 - Connect your device
- It’s time to connect to your Wi-Fi!
- Look for the ‘SSID’ – your network name, and WLAN Key – your password, on a sticker at the bottom of your modem.
- Connect your devices to Wi-Fi by searching for the ‘SSID’ and using the ‘WLAN’ key as the security password.
- To connect a device directly, plug one end of the supplied Ethernet cable into the yellow LAN port on the back of the modem and the other into your device.

You’re all done!
If your internet isn’t working – go through each of the steps again before contacting our tech support team.
Is the sticker on your box blue? Great – let’s start!
1 - Plug in the cables
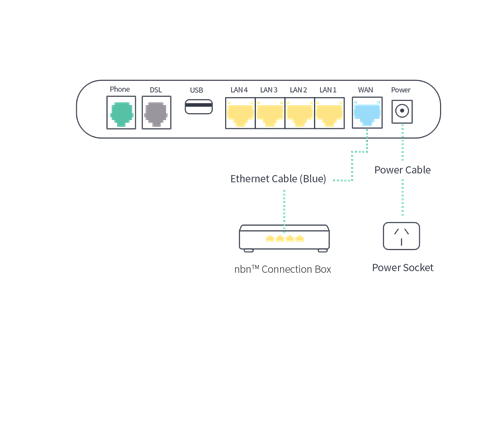
- Plug your power cable into the modem, and then into the power socket. Don’t forget to switch the power socket off first.
- It’s time for your phone. With an nbn® connection, you’ll plug your home phone into the ‘Phone 1’ port on your modem - not the wall socket.
- Next, plug one end of your ethernet cable into the WAN port on your modem, and the other end into one of the UNI-D ports on your NBN device.
- You can now use an ethernet cable to connect any devices that won’t be using a Wi-Fi connection.
2 - Check the lights
- Power up your modem by switching on your wall socket and pressing the power button on your modem.
- Wait 15 minutes for your modem to auto-configure.
- After 15 minutes, the first four lights (shown in the image below) should be on.
- If the lights haven’t turned on, turn your modem off and repeat this step.
3 - Connect your device
- It’s time to connect to your Wi-Fi!
- Look for the ‘SSID’ – your network name, and WLAN Key – your password, on a sticker at the bottom of your modem.
- Connect your devices to Wi-Fi by searching for the ‘SSID’ and using the ‘WLAN’ key as the security password.
- To connect a device directly, plug one end of the supplied Ethernet cable into the yellow LAN port on the back of the modem and the other into your device.
You’re all done!
If your internet isn’t working – go through each of the steps again before contacting our tech support team.
Is the sticker on your box blue? Great – let’s start!
1 - Plug in the cables
- Plug your power cable into the modem, and then into the power socket. Don’t forget to switch the power socket off first.
- It’s time for your phone. With an nbn® connection, you’ll plug your home phone into the ‘Phone 1’ port on your modem - not the wall socket.
- Next, plug one end of your ethernet cable into the WAN port on your modem, and the other end into one of the UNI-D ports on your NBN device.
- You can now use an ethernet cable to connect any devices that won’t be using a Wi-Fi connection.
2 - Check the lights
- Power up your modem by switching on your wall socket and pressing the power button on your modem.
- Wait 15 minutes for your modem to auto-configure.
- After 15 minutes, the first four lights (shown in the image below) should be on.
- If the lights haven’t turned on, turn your modem off and repeat this step.
3 - Connect your device
- It’s time to connect to your Wi-Fi!
- Look for the ‘SSID’ – your network name, and WLAN Key – your password, on a sticker at the bottom of your modem.
- Connect your devices to Wi-Fi by searching for the ‘SSID’ and using the ‘WLAN’ key as the security password.
- To connect a device directly, plug one end of the supplied Ethernet cable into the yellow LAN port on the back of the modem and the other into your device.

You’re all done!
If your internet isn’t working – go through each of the steps again before contacting our tech support team.
Is the sticker on your box orange? Great – let’s start!
1 - Plug in the cables
- Plug your power cable into the modem, and then into the power socket. Don’t forget to switch the power socket off first.
- It’s time for your phone. With an nbn® connection, you’ll plug your home phone into the ‘Phone 1’ port on your modem - not the wall socket.
- Next, plug one end of your ethernet cable into the WAN port on your modem, and the other end into the network box provided by nbn®.
- You can now use an ethernet cable to connect any devices that won’t be using a Wi-Fi connection.
2 - Check the lights
- Power up your modem by switching on your wall socket and pressing the power button on your modem.
- Wait 15 minutes for your modem to auto-configure.
- After 15 minutes, the first four lights (shown in the image below) should be on.
- If the lights haven’t turned on, turn your modem off and repeat this step.
3 - Connect your device
- It’s time to connect to your Wi-Fi!
- Look for the ‘SSID’ – your network name, and WLAN Key – your password, on a sticker at the bottom of your modem.
- Connect your devices to Wi-Fi by searching for the ‘SSID’ and using the ‘WLAN’ key as the security password.
- To connect a device directly, plug one end of the supplied Ethernet cable into the yellow LAN port on the back of the modem and the other into your device.
You’re all done!
If your internet isn’t working – go through each of the steps again before contacting our tech support team.
Is the sticker on your box green? Great – let’s start!
1 - Plug in the cables
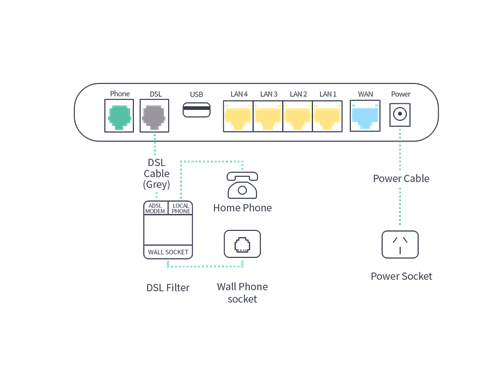
- Plug your power cable into the modem, and then into the power socket. Don’t forget to switch the power socket off first.
- Next, plug one end of a phone cable into the DSL port on your modem, and the other end into the ADSL modem port on your ADSL filter. Now plug the ADSL filter into your wall phone socket.
- It’s time for your phone. Plug your phone cable into the local phone port on the ADSL filter.
- You can now use an ethernet cable to connect any devices that won’t be using a Wi-Fi connection.
2 - Check the lights
- Power up your modem by switching on your wall socket and pressing the power button on your modem.
- Wait 15 minutes for your modem to auto-configure.
- After 15 minutes, the first four lights (shown in the image below) should be on.
- If the lights haven’t turned on, turn your modem off and repeat this step.
3 - Connect your device
- It’s time to connect to your Wi-Fi!
- Look for the ‘SSID’ – your network name, and WLAN Key – your password, on a sticker at the bottom of your modem.
- Connect your devices to Wi-Fi by searching for the ‘SSID’ and using the ‘WLAN’ key as the security password.
- To connect a device directly, plug one end of the supplied Ethernet cable into the yellow LAN port on the back of the modem and the other into your device.
You’re all done!
If your internet isn’t working – go through each of the steps again before contacting our tech support team.
Is the sticker on your box green? Great – let’s start!
1 - Plug in the cables
- Plug your power cable into the modem, and then into the power socket. Don’t forget to switch the power socket off first.
- Next, plug one end of a phone cable into the DSL port on your modem, and the other end into the ADSL modem port on your ADSL filter. Now plug the ADSL filter into your wall phone socket.
- It’s time for your phone. Plug your phone cable into the local phone port on the ADSL filter.
- You can now use an ethernet cable to connect any devices that won’t be using a Wi-Fi connection.
2 - Check the lights
- Power up your modem by switching on your wall socket and pressing the power button on your modem.
- Wait 15 minutes for your modem to auto-configure.
- After 15 minutes, the first four lights (shown in the image below) should be on.
- If the lights haven’t turned on, turn your modem off and repeat this step.

3 - Connect your device
- It’s time to connect to your Wi-Fi!
- Look for the ‘SSID’ – your network name, and WLAN Key – your password, on a sticker at the bottom of your modem.
- Connect your devices to Wi-Fi by searching for the ‘SSID’ and using the ‘WLAN’ key as the security password.
- To connect a device directly, plug one end of the supplied Ethernet cable into the yellow LAN port on the back of the modem and the other into your device.
You’re all done!
If your internet isn’t working – go through each of the steps again before contacting our tech support team.